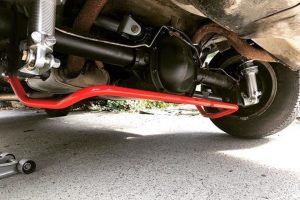
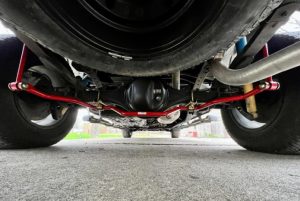
When your vehicle’s stabilizer bar (also called sway bar or anti-roll bar) or its mounts or end links wear out, replacing them yourself can save labor costs and give you greater insight into your suspension. That said, doing it safely and correctly is crucial. In this article, you’ll find a comprehensive guide — from the required tools, step-by-step procedure, safety precautions, and tips to ensure a job well done.
Why Replace a Stabilizer Bar or Its Components?

Before jumping into the process, here’s why you might consider replacement:
-
Clunking noises during cornering or going over bumps, signaling worn links or bushings.
-
Excessive body roll or decreased handling stability.
-
Visible wear, cracks, or corrosion on the bar, bushings, or link hardware.
-
Sagging or misalignment in suspension geometry caused by a failed component.
Replacing a full bar is less common than replacing bushings or end links, but in custom or performance applications you may swap the entire bar.
Tools & Materials You’ll Need
Before you begin, assemble the following:
Hand Tools & Equipment
-
Jack and jack stands (rated for your vehicle)
-
Wheel chocks
-
Lug wrench / breaker bar
-
Ratchet set and socket set (metric/imperial as needed)
-
Wrenches (open-end, box, combination)
-
Torque wrench
-
Penetrating oil (e.g. PB Blaster)
-
Hammer / mallet
-
Pry bar
-
Allen or hex keys (if needed for certain link designs)
-
Rubber or polyurethane stabilizer bushings (new)
-
New end links (if you are replacing them)
-
Grease / lubricant compatible with bushings
-
Clean rags and degreaser
Safety & Miscellaneous
-
Safety glasses
-
Gloves
-
Work light
-
Shop manual or torque specification sheet
-
Marking pencil or paint pen to mark orientation
Step-by-Step Procedure
Below is a generalized procedure for replacing a stabilizer bar assembly (bar, bushings, end links). Always refer to your vehicle’s service manual for specific differences.
| Step | Description | Notes / Tips |
|---|---|---|
| 1. Preparation & Safety | Park on level ground, engage parking brake, chock rear wheels | Always work in a safe, stable environment |
| 2. Loosen Wheel Lug Nuts | Loosen (don’t remove) lug nuts while vehicle is on the ground | Prevents wheel spin when jacked up |
| 3. Raise Vehicle & Remove Wheels | Use jack to lift, place jack stands under solid frame points, remove wheels | Ensure vehicle is stable before working underneath |
| 4. Inspect & Note Orientation | Observe current stabilizer bar, bushings, link orientation | Mark positions (with paint or pencil) so you install new parts in same alignment |
| 5. Remove End Links | Use penetrating oil on nuts, hold stud if needed, remove nuts either top or bottom first | Some links use Allen keys to prevent stud turning |
| 6. Remove Bar Mounting Brackets / Bushings | Unbolt the bracket clamps that hold the bar to the chassis | Retain bracket hardware if in good condition |
| 7. Remove Old Bushings & Clean Bar | Slide off old bushings, clean bar surfaces and bracket seats | Use a wire brush or degreaser to remove rust and debris |
| 8. Install New Bushings / Bar | Grease the inside of new bushings lightly, position them properly along bar | Use correct bushing type for bar diameter |
| 9. Re-mount Bar & Brackets | Bolt brackets loosely at first so the bar can settle into position | Don’t fully torque until end links are installed |
| 10. Reinstall End Links | Attach new (or same) end links, torque nuts to specification | Sometimes slight suspension compression is needed |
| 11. Torque All Hardware | Lower the vehicle (or keep slight load), torque bracket bolts and link nuts to spec | Check torque on all fasteners |
| 12. Reinstall Wheels & Lower | Replace wheels, tighten lug nuts in star pattern | Final torque lugs once on ground |
| 13. Final Inspection & Test Drive | Inspect for binding, rubbing, or misalignment; test drive gradually | Listen for noises and feel handling behavior |
Safety Tips & Best Practices
When working underneath a car and dealing with suspension parts, safety is paramount. Here are essential precautions:
-
Never rely solely on a jack — always use properly rated jack stands.
-
Work on firm, level surface, not soft ground.
-
Wear safety gear: glasses and gloves, especially when using penetrating oil or when debris may fall.
-
Release all suspension loads before loosening bolts, e.g. have wheels on ground or use spring compressors where needed.
-
Use the correct torque specs — under- or over-torquing can lead to failure or deformation.
-
Prevent binding of end links — make sure they stay vertical (or at intended angle) through suspension travel.
-
Mark positions before removal, so reassembly preserves alignment.
-
Check for clearance: ensure new bushings or brackets do not hit other parts during full travel.
-
Take cautious test drive: start with slow turns and bumps to detect issues.
Common Pitfalls & Troubleshooting
-
Binding or side loading — if the link or bar binds mid-travel, the link may be too short or misaligned.
-
Premature wear / squeaks — caused by dry bushings or improper lubrication.
-
Noise / clunking post install — recheck torque and correct orientation; check for loose hardware.
-
Incorrect part sizing — ensure bar diameter, link lengths, and bushing inner diameter match original.
-
Over-tightening bracket clamps — can deform bar or damage bushings.
Example Checklists
Pre-check before driving
-
All bolts torqued to spec
-
End links centered and free from load at rest
-
No contact or rubbing with frame, control arms, or tires
-
All tools removed from work area
-
Clear floor and surrounding areas
What to test during your test drive
-
Gradual left and right turns
-
Driving over bumps and undulations
-
Sudden direction changes (within safe limits)
-
Listen for squeaks, clunks, or popping
-
Feel for body roll, handling stability
Why Quality Parts and Proper Geometry Matter

Even with perfect installation, the performance depends on component quality and geometry:
-
Bushings that are too soft reduce effectiveness or introduce compliance.
-
Link angles and length must suit your suspension travel.
-
Bracket alignment affects bar preload and twist behavior.
If you need to source reliable stabilizer bar components — bars, end links, brackets, bushings — check out this selection:
Buy Stabilizer & Components online
A good set of parts, installed precisely, will restore handling crispness and reduce unwanted body roll and noise.
Final Thoughts
A DIY stabilizer bar replacement can be a rewarding project if done carefully and methodically. The steps above walk you through the process from start to finish — with safety, proper tools, and a quiet test drive in mind. By doing it yourself, you gain confidence in your suspension, save labor costs, and ensure your car maintains optimal handling.
Should you need quality components or upgrades for your installation, don’t forget to Buy Stabilizer & Components online. Taking the time to choose the right parts and install them correctly will pay off in better ride quality and handling confidence on every drive.